Tempered chocolate

The 3 stages of tempering: How to temper chocolate correctly

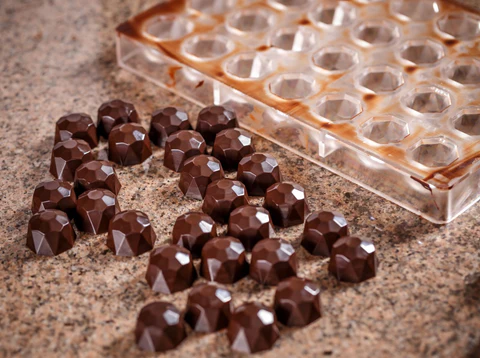
Have you ever had a batch of chocolate come out of the mould dull, greyish or streaky? Or had the chocolate stuck to the mould and refused to release?

The difference between that and a glossy, crisp chocolate with a clean snap comes down to one thing – tempering.

In this article, we walk through the three stages of tempering step by step, and give you the specific temperatures for dark, milk and white chocolate. This article is written for you if you produce chocolate and want to understand what happens when you temper – and why it is critical to the finished product.

See our industrial tempering machines

What properly tempered chocolate looks like

When chocolate is correctly tempered, you can see and feel it in the finished product:

  • A glossy, even surface with no grey streaks or patches
  • A clean snap when the chocolate is broken
  • An even colour throughout
  • Contraction in the mould, so the chocolate releases cleanly
  • Longer shelf life, because the fat has been stabilised

Poorly tempered chocolate, on the other hand, will take a long time to set, have a greyish colour and stick to the moulds. This applies equally to filled chocolates, figures, bars and enrobed products.

What is tempering

Chocolate contains cocoa butter. Cocoa butter is a fat that can crystallise in several different forms as it moves from a liquid to a solid state. Only one of these crystal forms produces the glossy, crisp chocolate you want – the so-called Form V crystal (also known as the beta crystal).

Tempering is the process by which you deliberately control which crystal form develops as the chocolate sets. It is done by taking the chocolate through three temperature stages: melting, cooling and heating to working temperature.

The process is also referred to as pre-crystallisation, because crystal formation is initiated before the chocolate has fully set.

The 3 stages of tempering

Below are the temperatures you need to work with. The figures are set out by Belcolade and align with the recommendations from Callebaut Chocolate Academy.

Chocolate type1. Melting2. Cooling3. Working temperature
Dark chocolate50–55 °C27–28 °C29–30 °C
Milk chocolate48–50 °C26–27 °C28–29 °C
White chocolate40–42 °C25–26 °C27–28 °C

Note that temperatures may vary slightly from one manufacturer to another. Always check the recommendations on the packaging of the chocolate you are working with.

Stage 1: Melting

Purpose: To melt all existing crystals in the chocolate, so that you start from a uniform, clean base.

When the chocolate is heated to its melting temperature, both the stable and unstable crystals present from the outset melt. This is necessary because crystal formation then needs to be controlled during the cooling and heating stages.
In production:

  • Melting typically takes place in a melting tank or directly in the tempering machine.
  • Heat must be applied indirectly – either via a water jacket or electrical heating elements – so that the chocolate is not exposed to direct contact with a heat source that could burn or separate it.
  • The chocolate must be stirred continuously during heating to ensure an even temperature throughout the mass.
  • Water must not come into contact with the chocolate. Even small amounts can cause the mass to bind into a thick, grainy structure (known as seizing) that cannot be recovered.

Melting temperature:

  • Dark chocolate: 50–55 °C
  • Milk chocolate: 48–50 °C
  • White chocolate: 40–42 °C

Stage 2: Cooling

Purpose: To allow the desired beta crystals to begin forming.
As the chocolate cools, the cocoa butter begins to crystallise. At the correct cooling temperature, both stable and less stable crystals form – and this is where the foundation for good tempering is laid.

In production:

  • Cooling takes place under constant stirring, so that the temperature becomes uniform throughout the mass.
  • In a compressor-cooled tempering machine, the cooling is controlled automatically via the compressor, which cools the machine’s jacket to the required temperature.
  • In a water-cooled tempering machine, cold water is circulated through the machine’s jacket, drawing the heat out of the chocolate.
  • The most widely used method for supporting crystal formation is the seeding method: unmelted callets are added to the warm chocolate, seeding it with stable crystals while simultaneously bringing the temperature down.

Cooling temperature:

  • Dark chocolate: 27–28 °C
  • Milk chocolate: 26–27 °C
  • White chocolate: 25–26 °C

Stage 3: Heating to working temperature

Purpose: To remove the unstable crystals and leave only the stable beta crystals.

After cooling, the chocolate contains a mixture of stable and unstable crystals. The unstable crystals melt at a lower temperature than the stable ones. By gently reheating the chocolate, the unwanted crystals are melted away, while the stable ones are retained.

In production:

  • Reheating is carried out gradually and under constant stirring.
  • Tempering machines automatically hold the chocolate at working temperature until it is needed.
  • The working temperature must not be exceeded. If the temperature exceeds the specified range, the stable beta crystals melt as well, and the entire tempering process must be restarted.

Working temperature:

  • Dark chocolate: 29–30 °C
  • Milk chocolate: 28–29 °C
  • White chocolate: 27–28 °C

At working temperature, the chocolate is ready for moulding, enrobing, decorating, or filling.

How to check whether the chocolate is tempered

Before a batch of chocolate is used in production, the temper can be verified with a simple test:

The smear test: Spread a small amount of chocolate onto a piece of baking paper or a palette knife. If the chocolate sets glossy and firm within 5 minutes, it is correctly tempered. If it remains soft, dull or develops grey streaks, tempering has not been successful.

Choosing a tempering machine

A tempering machine precisely controls temperatures across all three stages and provides continuous stirring, ensuring every batch is consistent. The choice of machine depends on production volume, cooling method and how the machine is to be integrated into the rest of the production line.

At Chocoma, we offer two types of tempering machines designed for different production needs:

  • Compressor-cooled tempering machines (20 kg and 2 × 20 kg) – well suited to small and medium-sized producers who require precise temperature control and consistent quality, for example, when producing pralines and specialities.
  • Water-cooled tempering machines (up to 200 kg) – well suited to larger producers who require high capacity, and which can be integrated with enrobing and moulding lines.

We also offer melting machines, which handle the first stage in larger production set-ups and supply melted chocolate onwards to the tempering machine.